Differences Between Acrylic and Polyester Resins

When it comes to crafting, industrial applications, or even DIY projects, choosing the right resin is crucial. Among the most popular resins are acrylic and polyester resins, each with its own unique properties and uses. To make an informed decision, it’s essential to understand the differences between these materials. In this blog, we'll delve into the characteristics, applications, and comparative advantages of acrylic and polyester resins.

Acrylic Resins

Characteristics:

  • Clarity and Color Stability: Acrylic resins are renowned for their exceptional clarity and long-term color stability. They do not yellow over time, making them ideal for applications where appearance is critical.
  • Durability: Acrylic resins are highly resistant to UV light and weathering, which makes them suitable for outdoor applications.
  • Ease of Use: They are easy to work with, as they cure quickly and do not require extensive preparation or post-processing.

Applications:

  • Decorative Items: Due to their clarity and stability, acrylic resins are often used in creating decorative items such as jewelry, ornaments, and transparent display pieces.
  • Protective Coatings: They are widely used in protective coatings for artworks, providing a clear, durable finish.
  • Signage: Acrylic is a preferred material for signs and displays due to its optical clarity and resistance to fading.

Polyester Resins

Characteristics:

  • Strength and Rigidity: Polyester resins are known for their high tensile strength and rigidity, making them suitable for structural applications.
  • Cost-Effective: They are generally more affordable compared to other resins, making them a popular choice for large-scale projects.
  • Versatility: Polyester resins can be easily pigmented, making them versatile for various applications where color is important.

Applications:

  • Boat and Automotive Parts: Due to their strength and rigidity, polyester resins are commonly used in the manufacturing of boat hulls and automotive body parts.
  • Fiberglass Reinforcement: They are often used in conjunction with fiberglass to create strong, lightweight composite materials.
  • Construction: Polyester resins are used in construction for creating durable, weather-resistant components such as roofing sheets and panels.

Uses and Differences Between, Acrylic, Epoxy, Polyurethane, and Polyester Casting Resin

To provide a broader perspective, it’s helpful to consider how acrylic and polyester resins compare to other types of resins like epoxy and polyurethane.

  • Epoxy Resins: Known for their strong adhesive properties and chemical resistance, epoxy resins are ideal for bonding applications and coatings in harsh environments. They offer excellent mechanical properties and are often used in industrial settings.
  • Polyurethane Resins: These resins are highly flexible and abrasion-resistant, making them suitable for applications requiring elasticity, such as molds, coatings, and castings. Polyurethane resins are also known for their impact resistance and versatility in different formulations.

Comparative Summary

  • Acrylic vs. Polyester:

    • Acrylic is superior in terms of clarity and UV resistance, making it ideal for decorative and outdoor applications.
    • Polyester offers greater strength and rigidity at a lower cost, making it suitable for structural and large-scale applications.
  • Epoxy vs. Polyurethane:

    • Epoxy provides strong adhesion and chemical resistance, perfect for industrial and bonding applications.
    • Polyurethane excels in flexibility and impact resistance, suitable for molds, coatings, and applications requiring elasticity.

Conclusion

Choosing the right resin depends on the specific requirements of your project. Whether you prioritize clarity, durability, strength, or flexibility, understanding the differences between acrylic, polyester, epoxy, and polyurethane resins will help you make an informed decision. Each resin type offers unique benefits that can be leveraged to achieve the best results for your application.

Learning How to Make a Breast Cast: A Fun and Artistic Adventure


Are you fascinated by the world of body art and looking for a unique way to celebrate and preserve the beauty of the human form? Making a breast cast can be a fun and meaningful project that combines creativity, intimacy, and self-expression. Whether you're looking to create a lasting memory, a piece of art, or just enjoy a new experience, making a breast cast is a rewarding endeavor.

Why Make a Breast Cast?

Creating a breast cast is more than just an artistic activity; it’s a powerful way to embrace and honor your body. For many, it’s a celebration of femininity and a unique keepsake that can be cherished forever. Breast casts can also be used in pregnancy to capture the changes in your body or as a special gift for a partner.

Getting Started: My Breast Friends EZ Cast Kit

To make this process easy and accessible, the My Breast Friends EZ Cast Kit is your perfect companion. Designed with beginners in mind, this kit contains everything you need to create a high-quality, detailed breast cast. The kit includes:

  • Safe, skin-friendly casting materials
  • Step-by-step instructions
  • All necessary tools for a smooth casting experience

What You’ll Need:

Before diving into the process, gather all the materials provided in the My Breast Friends EZ Cast Kit. You might also want to have some old towels or sheets to cover your work area, a friend to help you, and a bit of patience.

Step-by-Step Guide to Making Your Breast Cast

1. Prepare Your Space

Choose a comfortable, well-lit area where you can sit or stand comfortably. Cover your workspace with old towels or sheets to keep everything clean. Have your My Breast Friends EZ Cast Kit ready and within reach.

2. Prepare Your Skin

Apply a generous amount of petroleum jelly or the skin-safe release agent provided in the kit to the area where you'll be casting. This will make it easier to remove the cast once it’s set and prevent any discomfort.

3. Mix the Casting Materials

Follow the instructions provided in the kit to mix the casting materials. Usually, this involves mixing the plaster with water to create a smooth, lump-free consistency.

4. Apply the Cast

Start applying the casting material to your chest, covering the entire area you want to cast. It’s best to work in layers, applying the material evenly and smoothing it out as you go. Having a friend assist you can make this step easier and ensure a more even application.

5. Let It Set

Once the cast is applied, allow it to set. This typically takes about 15-30 minutes. Try to stay as still as possible during this time to avoid any cracks or distortions in the cast.

6. Remove the Cast

Gently and carefully remove the cast once it has hardened. You might need to wiggle a bit to loosen it, but the release agent should make this step smooth and painless.

7. Finishing Touches

After removing the cast, let it dry completely. You can then sand any rough edges and paint or decorate your cast to personalize it further. This is where you can let your creativity shine, adding colors, designs, or even messages.

Tips for a Successful Breast Cast

  • Stay Still: Movement can cause cracks or imperfections in the cast.
  • Use a Helper: Having a friend to assist you makes the process smoother and more fun.
  • Follow Instructions: Carefully follow the instructions provided in the My Breast Friends EZ Cast Kit for the best results.

Conclusion

Making a breast cast is a wonderful way to celebrate your body and create a unique piece of art. With the My Breast Friends EZ Cast Kit, you have everything you need to get started. Embrace the experience, enjoy the process, and create a lasting memory that you can cherish forever. So, gather your supplies, grab a friend, and get ready to make your very own breast cast!

For those intrigued by the intersection of art and body, this project is a fantastic way to explore and express your creativity. Whether it's for a special occasion or just for fun, making a breast cast is an adventure worth taking.

Exploring Clays and Waxes

When it comes to sculpting, modeling, and creating stunning art pieces, artists understand that the choice of materials is paramount. It's not just about envisioning the final masterpiece; it's about selecting the right tools to bring that vision to life with precision and finesse. Among the vast array of options available, clays and waxes stand out as stalwarts in the artist's arsenal. But what makes them so indispensable?

What qualities do they possess that make them the preferred mediums for countless creators? In this exploration, we'll delve into the essence of clays and waxes, uncovering their unique characteristics, unraveling the mystery behind their allure, and uncovering the secrets of their versatility. From understanding the fundamental nature of these materials to discovering the best sources for acquiring them, we'll embark on a journey that illuminates the artistry and craftsmanship inherent in every sculpting endeavor.

So, whether you're a seasoned professional seeking to hone your skills or an aspiring artist eager to embark on your creative journey, join us as we unravel the intricacies of clays and waxes and unlock the potential they hold for your next masterpiece.

Clays and Waxes Plasticine clay

What are Clays and Waxes?

Clays are versatile materials derived from natural soil compounds, characterized by their fine-grained texture and ability to transform into a pliable state when moistened. This unique property allows artists to shape and mold them into various forms before they harden upon drying or firing.

The history of clay usage in art dates back thousands of years, with civilizations around the world utilizing it for pottery, ceramics, and sculptural creations. One standout among the myriad clay types is Plasticine clay, cherished for its non-drying composition and reusability. Renowned for its flexibility and ease of manipulation, Plasticine clay has become a staple choice for artists, particularly in fields requiring intricate detailing and animation.

Waxes present a distinct set of properties in the realm of artistic mediums. These malleable substances undergo a transformative process, transitioning from a solid state to a liquid form when subjected to heat, only to solidify again upon cooling.

This unique characteristic makes waxes highly adaptable for a wide array of artistic applications, including modeling, casting, and even painting. Artists appreciate waxes for their ability to achieve smooth textures and capture intricate details with precision, making them invaluable tools for bringing complex designs and prototypes to life. With their versatility and tactile qualities, waxes offer artists the freedom to explore diverse artistic expressions and push the boundaries of their creativity.

Plasticine clay

Where Can You Find the Best Clays and Waxes?

When it comes to sourcing top-quality clays and waxes for your artistic endeavors, the search for excellence can often feel like navigating a labyrinth. However, fear not, for the ultimate destination for your creative needs lies within the extensive offerings of EnvironMolds LLC. Nestled in the vibrant artistic hub of Summit, New Jersey, EnvironMolds stands as a beacon of craftsmanship and innovation in the realm of sculpting materials.

EnvironMolds prides itself on curating a diverse selection of premium clays and waxes, meticulously chosen to meet the exacting standards of both seasoned professionals and budding enthusiasts alike. Among their distinguished collection, one gem shines brightest: the renowned Plasticine clay. Renowned for its unparalleled pliability and durability, this exceptional clay has become a staple in the arsenal of artists worldwide, facilitating the realization of their most intricate visions with unparalleled ease and precision.

Whether you're a seasoned sculptor seeking to breathe life into your latest masterpiece or an aspiring artisan eager to embark on your creative journey, EnvironMolds ensures that every product in their catalog is imbued with the same commitment to excellence and integrity. With EnvironMolds, you can trust that your artistic endeavors will be supported by materials of the highest caliber, empowering you to unleash your boundless creativity and bring your imagination to life in tangible form.

Plasticine clays

Clays and Waxes Problems and Solutions

Plasticine Clay:

Preparation: Before diving into your sculpting session, it's beneficial to warm the Plasticine clay. You can achieve this by kneading it in your hands or gently placing it in a low-temperature oven. This process softens the clay, making it more pliable and easier to work with.

Modeling: Once your Plasticine clay is warmed up, it's time to unleash your creativity. Whether you're shaping it with your fingers or using sculpting tools, the key is to manipulate the clay to bring your vision to life. Take your time to refine details and textures, as Plasticine clay is known for its ability to hold intricate designs.

Maintenance: After you've finished your masterpiece or need to take a break, proper storage is essential to preserve your Plasticine clay. Store it in a cool, dry place to prevent dust accumulation and maintain its pliability for future use. Keeping it in an airtight container can also help prolong its lifespan.

Waxes:

Melting: Unlike clays, waxes require melting before they can be molded or sculpted. To melt wax safely, use a double boiler method. Place the wax in a heatproof container and set it over a pot of simmering water. This indirect heat source ensures that the wax melts evenly without the risk of burning.

Pouring: Once the wax is melted to a smooth consistency, it's time to pour it into your desired molds or onto surfaces. Be cautious during this step to avoid spills or splatters. Pour the wax slowly and steadily to create even layers and minimize air bubbles.

Carving: After the wax has solidified, it's ready for carving and detailing. Use specialized carving tools designed for wax to refine your piece and add intricate designs. Take your time and work patiently, as wax can be delicate and prone to chipping if not handled carefully.

Why Use Clays and Waxes?

The reasons for using clays and waxes in your art projects are plentiful:

  • Versatility: Both materials can be used for a wide range of applications, from sculpting to mold making.
  • Detailing: They allow for precise and intricate details, crucial for professional-quality art.
  • Reusability: Especially with Plasticine clay, you can reuse the material multiple times, making it cost-effective.
  • Creative Freedom: They provide endless possibilities for creativity, letting your imagination run wild.

Conclusion

By choosing the right materials, you not only enhance the quality of your work but also make the creative process more enjoyable. Clays and waxes are essential tools for any artist, providing versatility, detail, and reusability. So, whether you are a seasoned artist or just starting out, consider incorporating high-quality clays and waxes into your toolkit. And remember, for the best selection, visit EnvironMolds LLC and explore their offerings today!

FAQs

What is the best clay for beginners?

Plasticine clay is great for beginners because it is easy to use, non-drying, and reusable.

How do I prevent wax from sticking to molds?

Use a mold release agent before pouring the wax to ensure easy removal.

Can I mix different types of clays?

It’s generally not recommended to mix different types of clays as they have different properties and curing processes.

How should I store my clay?

Store clay in a cool, dry place, ideally in airtight containers to prevent it from drying out or getting dirty.

Capturing the Human Form with a Full Torso Casting Kit

Have you ever wanted to preserve a special moment in time? Perhaps a milestone birthday or the perfect physique you've worked so hard to achieve? A full torso cast can be a unique and personal way to commemorate a significant chapter in your life.

Full Torso Casting Kit

What is a Full Torso Casting Kit?

A full torso casting kit provides all the materials you need to create a mold of the front and back of a person's torso. This mold can then be used to cast a replica in a variety of materials, such as concrete, jesmonite, or resin. The resulting cast is a stunning and three-dimensional representation of the human form, perfect for artists, sculptors, or anyone who wants to cherish a lasting memento.

What Can You Use a Full Torso Casting Kit For?

The applications for a full torso cast are as varied as your imagination. Here are a few ideas:

  • Commemorate a special occasion: Capture the physique of a graduating athlete, the changing form of a pregnant woman, or simply the enduring love between partners.
  • Create a unique work of art: Artists can use torso casts as a base for sculptures or other mixed-media creations.
  • Educational purposes: Medical professionals or art students can use torso casts for anatomical study.

Key Considerations Before You Begin

While the concept of creating a full torso cast may seem appealing, it's important to consider a few factors before you dive in:

  • Skill Level: ArtMolds acknowledges that this is an intermediate to advanced skilled project. Creating a clean and accurate cast requires careful preparation, technique, and an understanding of the materials involved.
  • Material Quality: High-quality materials are essential for a successful cast. ArtMolds assures customers that their casting kits include high-quality materials.
  • Support: Having access to helpful resources and support throughout the casting process can be invaluable. ArtMolds highlights that their staff is available to assist with any questions or challenges you may encounter.

Conclusion

A full torso casting kit can be a rewarding experience for those who are up for the challenge. By carefully considering the skill level required, the quality of the materials, and the availability of support, you can create a lasting and cherished piece of art.

If you're looking to embark on this unique artistic journey, then the ArtMolds Full Torso Casting Kit - Front & Back is a great place to start. With its high-quality materials and knowledgeable staff, ArtMolds can help you capture the essence of the human form and preserve it for years to come.

Full Torso Casting Kit FAQs

Thinking about creating a full torso cast?

It's a fantastic way to preserve a special moment or create a unique piece of art. But before you dive in, here are some frequently asked questions to help you navigate the process:

What's the difficulty level of creating a full torso cast?

Full torso casting is generally considered an intermediate to advanced project. It requires careful preparation, following instructions precisely, and some understanding of the materials involved.

What kind of materials are included in the ArtMolds Full Torso Casting Kit - Front & Back?

ArtMolds assures customers their kit includes high-quality materials like MoldGel alginate-based mold powder, CastRite casting stone, MoldEZ mold release, GelStick alginate bonder, plaster bandages, and other essentials for creating a clean and accurate cast.

Do I need any additional materials?

The ArtMolds kit provides most of what you'll need. However, you'll likely need a few household items like a large mixing bowl, water, and a drop cloth for workspace protection.

Is there any support available if I encounter problems?

Absolutely! ArtMolds highlights that their staff is there to help. If you have questions or run into challenges during the casting process, you can reach out to their knowledgeable team for assistance.

How long does the casting process take?

The casting process itself can be broken down into two main parts: creating the mold and casting the final form. The mold creation can take around 30 minutes, with a similar time needed for the cast to set. However, there's also prep work and drying time to consider, so plan on dedicating several hours to the entire project.

What can I cast my torso in?

Once you have your mold, you can cast your torso in a variety of materials, depending on your desired outcome. Popular choices include concrete, jesmonite, or resin. Each material offers unique properties in terms of weight, durability, and finish.

Is the casting process safe?

Yes, but following safety precautions is crucial. When working with casting materials, wear gloves to protect your skin and work in a well-ventilated area to avoid inhaling dust.

Where can I find more information on using the ArtMolds Full Torso Casting Kit?

ArtMolds offers a wealth of resources on their website to help you get the most out of their casting kits. Look for video tutorials, FAQs, and detailed instructions to guide you through the process.

Are there any alternatives to creating a full torso cast myself?

If you're not comfortable with the DIY approach, you can find artists or studios specializing in body casting. They'll have the experience and expertise to create a high-quality cast for you.

Physical Properties of Alginate Gel

Physical Properties of Alginate Gel

Image Source :- link.springer.com


Alginate gel, a polysaccharide derived from brown seaweed, is widely used in various fields due to its unique physical properties. From biomedical applications to food technology, alginate gels play a crucial role thanks to their versatility and biocompatibility. This blog will explore the physical properties of alginate gel, delving into its formation, gel power, rheology, porosity, release characteristics, syneresis, swelling, effects of pH, and the rheology of alginate solutions.
 

Table of Contents


1. Gel Formation
2. Gel Power
3. Rheology of Alginate Gels
4. Porosity and Permeability
5. Release Characteristics
6. Syneresis and Swelling
7. Effects of pH]
8.
Rheology of Alginate Solutions


Product Source :- LifeMold Silica Free Alginate 3-4 Min Set


Gel Formation


Alginate gel formation is primarily driven by the interaction between alginate and divalent cations, such as calcium ions (Ca²⁺). This process, known as ionotropic gelation, occurs when the cations cross-link the guluronic acid blocks of the alginate chains, forming a three-dimensional network. The gelation can be fine-tuned by varying the concentration of alginate and calcium ions, the presence of other ions, and environmental conditions such as temperature and pH.


Gel Power


Gel power refers to the ability of alginate to form a gel and is influenced by several factors including the molecular weight of the alginate, the ratio of mannuronic acid (M) to guluronic acid (G), and the concentration of gelling ions. High G-content alginates typically form stronger and more brittle gels, whereas high M-content alginates form softer and more elastic gels. The optimal gel power is crucial for specific applications, such as in food where texture is important, or in drug delivery systems where controlled release is needed.
 

Rheology of Alginate Gels


Rheology studies the flow and deformation of materials. For alginate gels, rheological properties are significant as they determine the gel’s mechanical behavior under different conditions. Factors such as gel strength, elasticity, and viscosity are measured using rheometers. Alginates gels generally exhibit viscoelastic behavior, meaning they have both solid and liquid characteristics. This behavior is crucial for applications requiring specific mechanical properties, such as tissue engineering scaffolds and wound dressings.
 

Porosity and Permeability


The porosity and permeability of alginate gels are critical for applications involving cell encapsulation and controlled release systems. Porosity refers to the presence of pores within the gel, while permeability measures how easily substances can pass through these pores. High porosity and permeability are desirable in biomedical applications for nutrient and waste exchange. The porosity can be controlled by adjusting the concentration of alginate and the cross-linking ions, as well as by incorporating pore-forming agents.

Image Source :- sciencedirect.com

Release Characteristics


Alginate gels are excellent carriers for controlled release of active substances, such as drugs, due to their biocompatibility and tunable properties. The release characteristics are influenced by factors such as the gel matrix composition, the size of the encapsulated molecules, and the degree of cross-linking. By modifying these parameters, the release rate can be controlled, making alginate gels ideal for sustained and targeted drug delivery.
 

Syneresis and Swelling


Syneresis and swelling are important physical phenomena observed in alginate gels. Syneresis is the expulsion of water from the gel, often occurring over time or due to changes in environmental conditions. Swelling is the absorption of water, causing the gel to expand. Both syneresis and swelling are influenced by the composition of the alginate, the cross-linking density, and the surrounding medium. Understanding these behaviors is essential for applications where dimensional stability is critical.
 

Effects of pH


The pH of the environment significantly affects the properties of alginate gels. At low pH, alginate tends to form a precipitate due to protonation of carboxyl groups, leading to gel instability. At neutral to slightly basic pH, alginate gels are more stable and exhibit better mechanical properties. Adjusting the pH can therefore be used to control the gelation process and the final properties of the gel, which is particularly useful in applications like drug delivery and food products.
 

Rheology of Alginate Solutions


Before gelation, the rheology of alginate solutions is also important. The viscosity of alginate solutions depends on the concentration of alginate, the molecular weight, and the temperature. High-viscosity solutions are often required for applications like 3D printing and extrusion, where precise control over the flow is needed. Understanding the rheological properties of alginate solutions helps in designing processes and products that leverage the unique characteristics of alginate gels.

In conclusion, alginate gels exhibit a range of physical properties that make them suitable for various applications. By understanding and manipulating these properties, scientists and engineers can create tailored solutions for specific needs, from medical devices to food products.

Art Therapy with Plaster of Paris Bandages: A Healing Journey

 Art Therapy with Plaster of Paris Bandages: A Healing Journey


In the realm of therapeutic practices, art therapy has emerged as a powerful catalyst for self-expression, emotional healing, and personal growth. Among the various mediums utilized in this field, the use of plaster of Paris bandages has gained recognition for its unique ability to facilitate a profound and immersive journey of self-discovery. This therapeutic approach transcends the boundaries of traditional art forms, offering individuals a tactile and transformative experience that nurtures both creativity and emotional well-being.

The Therapeutic Power of Plaster of Paris Bandages

Plaster of Paris bandages, with their malleable and versatile nature, have become a valuable tool in the art therapy realm. These materials allow participants to sculpt and shape their emotions, thoughts, and experiences into tangible forms, providing a cathartic release and a deeper understanding of their inner selves. The act of molding and manipulating the plaster bandages becomes a metaphor for reshaping one's perspective and embracing personal growth.

Through this therapeutic process, individuals can externalize their internal struggles, fears, and aspirations, giving them a physical manifestation that can be explored, understood, and ultimately transformed. The tactile experience of working with the bandages fosters a sense of presence and mindfulness, enabling participants to fully immerse themselves in the creative journey and release any pent-up emotions or tensions that may have been weighing them down.


Exploring Emotions Through Tactile Expression

One of the key benefits of using plaster of Paris bandages in art therapy is the opportunity for tactile expression. In our fast-paced and digitally driven world, the act of physically shaping and sculpting a material can be a grounding and therapeutic experience. By engaging their hands and senses, individuals can connect with their emotions on a deeper level, facilitating a more profound exploration of their inner landscapes.

The tactile nature of this process encourages mindfulness and presence, allowing participants to fully immerse themselves in the creative journey. As they mold and manipulate the plaster bandages, they may uncover hidden aspects of themselves, confront challenging emotions, or gain new insights into their experiences. This hands-on approach to self-expression can be particularly powerful for those who struggle to verbalize their feelings or find traditional talk therapy challenging.

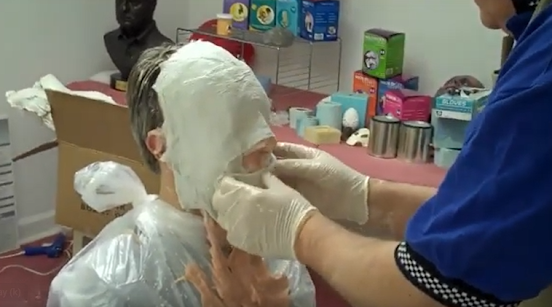
How to Apply Plaster of Paris Bandages


Fostering Self-Discovery and Personal Growth

Art therapy with bandages is not merely about creating visually appealing artwork; it is a profound journey of self-discovery and personal growth. As participants engage with the material, they may uncover hidden aspects of themselves, confront challenging emotions, or gain new insights into their experiences. This therapeutic process empowers individuals to embrace their authenticity and cultivate a greater sense of self-awareness.

Through the act of sculpting and shaping the plaster bandages, individuals can explore their personal narratives, identify patterns or belief systems that may be holding them back, and ultimately redefine their self-perceptions. The physical manifestation of their emotions and experiences can serve as a powerful catalyst for personal growth, enabling individuals to confront their fears, embrace their strengths, and develop a deeper understanding of who they are.

Collaborative and Supportive Environments

One of the unique aspects of art therapy with this is the opportunity for collaboration and support. While individual sessions offer a focused and personal environment, group settings can provide a profound sense of community and shared understanding.

In group art therapy sessions, participants have the chance to witness the creative journeys of others, fostering empathy, compassion, and a deeper appreciation for diverse perspectives. This supportive environment encourages open communication, vulnerability, and a safe space for individuals to share their experiences without fear of judgment.

Through the act of creating and sharing alongside others, a sense of camaraderie and connection can emerge, reminding participants that they are not alone in their struggles or triumphs. Group dynamics can also inspire new insights, as individuals may find resonance or inspiration in the artistic expressions of others, furthering their own personal growth and healing process.

Conclusion:

Art Therapy with Plaster of Paris Bandages is a transformative journey that combines creativity, self-expression, and healing. At ArtMolds, we believe in the power of art to unlock personal growth and emotional well-being. Explore the world of plaster bandages and embark on a healing odyssey that will unleash your creativity and foster self-discovery. Experience the therapeutic magic of art and witness the profound impact it can have on your life.

Through the tactile and immersive process of shaping and sculpting plaster bandages, individuals can embark on a journey of self-exploration, emotional release, and personal transformation. Whether undertaken individually or in a supportive group setting, this therapeutic approach offers a unique opportunity to embrace one's authenticity, confront inner challenges, and cultivate a deeper sense of self-awareness and growth.

Crafting a Realistic Human Head with Ballistic Gel

 Crafting a Realistic Human Head with Ballistic Gel


Creating lifelike human replicas is a fascinating process, especially for those in the movie industry or special effects design. One of the most effective materials for making realistic human heads is ballistic gel. Used widely for testing the impact of bullets, ballistic gel provides an accurate representation of human tissue. This guide will walk you through the process of making a human head using ballistic gel, incorporating products from ArtMolds.
 

 Materials You Will Need


Ballistic Gel: Choose a high-quality ballistic gel for the best results.

Ballistic Clay: Useful for fine-tuning details.

Mold: A human head mold that suits your project needs.

Sculpting Tools: For detailing and adjustments.

Heating Equipment: To melt and pour the ballistic gel.

Skin Tone Paints and Makeup: To add a realistic appearance to the final product.
 

Step-by-Step Instructions


Step 1: Prepare Your Workspace
Ensure your workspace is clean and organized. Lay down protective sheets to catch any spills and have all your tools and materials within easy reach.

Step 2: Heat the Ballistic Gel
Follow the instructions provided with your ballistic gel. Typically, you will need to heat the gel to a specific temperature to make it pourable. Use a microwave or a double boiler method for controlled heating.

Step 3: Pour the Gel into the Mold
Carefully pour the heated ballistic gel into your human head mold. Pour slowly to avoid bubbles, which can mar the final appearance. Allow the gel to cool and set completely, which may take several hours depending on the size of the mold and the gel's properties.

Step 4: Demold the Head
Once the gel has set, gently remove the human head from the mold. Be careful not to damage any features. If needed, use sculpting tools to refine any imperfections or to add more detail.

Step 5: Adding Realism with Ballistic Clay
For more detailed work, use ballistic clay to sculpt fine features like wrinkles, scars, or other unique characteristics. Ballistic clay is malleable and adheres well to ballistic gel, making it perfect for this purpose.

Step 6: Painting and Detailing
Once you are satisfied with the sculpted head, it's time to add color. Use skin tone paints and makeup to give your ballistic dummy a realistic appearance. Pay special attention to shading and highlights to enhance the lifelike effect.

Step 7: Final Touches
Review the entire ballistic gel dummy for any final touches. Ensure that the details are sharp and the colors are blended well. Your ballistic gel torso or head should now look impressively realistic.

 Tips for Success


Consistency is Key: Ensure that the gel is heated evenly to avoid any inconsistencies in texture.

Take Your Time: Rushing through the sculpting and painting process can lead to a less realistic result.

Experiment: Don’t be afraid to try different techniques and tools to achieve the best look.

 Applications

Ballistic gel dummies are incredibly useful not only in film and special effects but also in scientific research, medical training, and even forensic studies. Creating a realistic human head with ballistic gel can bring a new level of authenticity to your projects.

For all your ballistic supply needs, including ballistic gel, ballistic clay, and molds, check out the products available at ArtMolds.

By following these steps, you'll be able to create a realistic and detailed human head that can withstand impact testing, adding a new layer of authenticity to your work. Whether for a blockbuster movie or a detailed scientific study, your ballistic dummy will impress and perform admirably.

Happy crafting!