Using Liquid Latex Casting Rubber

EnvironMolds Premium Latex Casting Rubber is a consummate liquid latex formulation that serves well for varied applications. It can be used to make masks and other hollow items with different methods.

Liquid latex rubber is a popular material in the world of mold making and casting. It is tough, durable and tear resistant, apart from being an economical product. It is commonly used to make different types of molds for casting plaster, resin and other materials. The same material can also double up as a casting product, albeit in a less viscous form.

In fact, latex casting rubber is a popular theatrical product to create special effects like wrinkles, scars and gashes. It is also used to make all kinds of masks and other thin skin products.

EnvironMolds Premium Latex Casting Rubber is an exceptional casting rubber specifically formulated for making hollow molded rubber articles, toys and flexible props. It lends itself well for making masks, puppet heads, imitation pottery and display articles. It is especially useful for creating general special effects for film, television and stage work. Furthermore, the same product is considered appropriate for coating and texturing foams such as polystyrene, especially for special effects applications.

The liquid nature of latex casting rubbers makes it very easy to use. Pouring or painting are the common methods of making latex casts. All it takes is successive coats of the latex over or inside the mold to make the hollow or thin skinned rubber items. It is useful for making gloves, fake food and other such items.


On the other hand, artists usually pour the latex casting rubber directly into the mold. The mold is filled till the brim and the latex is allowed to sit for some time post which the rubber is poured back into its original container. A thin layer of latex clings to the sides and base of the mold. This sets like a skin overnight and can be demolded easily. This method is commonly used for making masks.

Apart from this, you can also simply dip the mold into the latex to form a coating. Each coat has to be allowed to dry before dipping again to build up the required thickness. In fact, EnvironMolds Premium Latex Casting Rubber serves well for dip casting and can be used to form a protective coating on tools.

These latex casts cannot be finished with regular paints as it will tend to chip, crack or peel away. Special latex paints and dyes are available. These can be added to the rubber before starting the casting process or painted on the cured surface later on.

Moreover, you can also use a filler and extender like RubRfil to control the level of flexibility of the latex rubber cast. In case the liquid latex is too viscous for a particular application, mixing the requisite quantity of RubRfil will thicken the rubber and render it less flexible, hard or even very hard. This also serves to extend the quantity of the material.

EnvironMolds Premium Latex Casting Rubber, RubRfil, latex pigments and other materials can be easily sourced from https://www.artmolds.com

How To Make A Front Torso Cast

 Making a front torso cast can seem intimidating at first. However, it is the easiest life casting that can be tackled by beginner life casting artists as well. Let’s find out what lies in store….

A front torso casting can seem like a tall order because of the bigger dimensions involved. However, this is one of the easiest life castings as the body surface from neck to mid-section will be broad and mostly even, with hardly any undercuts. In fact, novice life casting artists often prefer to begin with torso casting before moving on to more complicated life casts like face and full body.


Yet, care is required when working on a living, breathing person. The model should be carefully briefed about what lies in store and warned about the issues like staying stationary, application of mold material, mold getting entangled in the body hair, waiting for the mold to set and so on.

The key to making a good torso cast lies in the posing. The model has to pose in a standing position, preferably propped up against a board or the wall for support. The pose can be a slightly leaning one to reveal the muscle tone, arms spread-eagled or on the sides of the waist. Women usually prefer to pose with hands on their breasts or encircling the belly in case of a pregnancy casting.

Once the model has been prepped, the body mold making process begins with applying petroleum jelly or other release agent all over the torso. Then apply a couple of layers of the alginate mix to form a thick and even coat. This alginate is skin safe and will not harm the model or the artist. It sets quickly and will capture all the fine details as well.

Once the alginate mold has set, it is covered with plaster bandages. The bandages are soaked in water and squeezed before applying on the alginate mold in a crisscross fashion. This will form a shell mold that supports the alginate and helps it retain the shape.

Allow the plaster mold to dry properly. Once it has set, the body mold can be easily demolded by loosening the edges with the fingertips. It will lift away easily and can then be cast with plaster or other choice of casting material. The casting should be done quickly as the alginate is likely to shrink on exposure to air.


There is a choice of making faux metal or stone life casting also by using the appropriate cold casting powder along with the casting material.

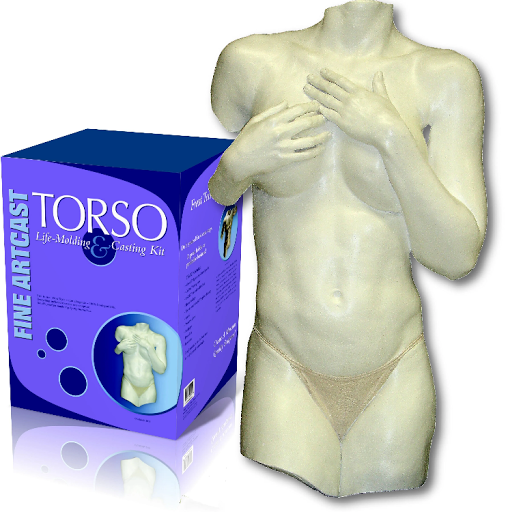
In sum, it is pretty easy to make a front torso life casting. It will take time and patience, but the artist will get better with practice. For further ease, EnvironMolds offers the comprehensive Front Torso Casting Kit. This contains the appropriate quantities of alginate, plaster powder and plaster bandages along with mold release, gloves, sandpaper and a handy instruction booklet as well.

The website, https://www.artmolds.com also throws up a helpful ‘How To Create A Front Torso Casting’ book. This how-to manual provides necessary instructions about the materials, preparations and techniques as well as tips for preparing the model, demolding and finishing the life cast. A model release form is also included.

Eliminating Estimation in Material Calculations

Why should artists rely on guesswork about the quantity or volume of materials required for making a mold or cast? EnvironMolds provides a Volume Calculator that throws up the exact amount needed.

There’s a lot of planning and coordination that goes into making a mold or cast. The artist has to not only choose the most suitable technique and material for making the mold/cast, but also assemble the requisite mold making or casting materials, supplies, tools and equipment.


For instance, making a block mold with silicone rubber will require plastic cups, gram scale, mixing sticks, electric mixer, mold box, release agent, glue gun, vacuum chamber and pump, gloves, knife, silicone rubber, etc.

While the artists pay careful attention to the requirements and collect the items before commencing the project, they rely on eyeball estimations for the amount of material they need to purchase or mix. For instance, if the artist mixes much more silicone rubber than actually required, the extra rubber will have to be thrown away – a sheer waste of money and resources. And if the rubber falls short, it will entail extra work of mixing more material or even rushing to the store to buy some more. The delay can even cause the artist to leave the project midway or if continued, mar the quality of the mold.

Newbie mold makers and casting artists are especially flummoxed about the amount of material they should use.

EnvironMolds comes to the rescue with a handy volume calculator on its website https://www.artmolds.com/volume-calculator. All the artist has to do is measure the dimensions of the mold box and model before feeding them in the calculator. A square or rectangular box requires the height, width and depth while cylindrical ones need the radius and height. The same rule applies for rectangular and cylindrical models respectively. Undercuts in the model can be ignored and the maximum outside dimensions will do.

This will throw up the net volume of the box, the model and finally the material needed. The calculator goes a step further and converts the net volume into the exact amount of rubber, plaster or resin required in grams or fluid ounces, as applicable.

For those who are looking for more detailed information on how to make molds and casts, EnvironMolds provides instructional books, videos, website links and blog posts as well.


Making Body Molds With Silicone

Silicone rubber can be formulated to be applied on the skin for making body molds. And LifeRite is leading the pack as the most-favored skin safe silicone rubber. Let’s find out more about the same.

Silicone rubber is a high-quality and durable material that is favored by artists for making molds and casts. Art stores’ aisles feature a range of specially formulated silicones that are suitable for almost any application ranging from general mold making and casting to food molds, baking containers, mask making, special effects and even duplicating skin surfaces.

Apart from this, there is a unique silicone rubber that can be safely used on the skin for life casting! Yes, you heard that right – alginate does not have to be the main staple for making body molds as a silicone formulation can be applied directly on the body to capture the shape of the face, hands, feet and other body parts. And these silicone body molds are long-lasting for multiple castings unlike their single use alginate counterparts!

In fact, LifeRite Skin Safe Silicone Rubber is favored by life casting artists, special effects artists and even for prosthetics due its superior quality and excellent results. This is a two-component, platinum-cured, room temperature cure silicone rubber with excellent physical properties like flexibility, quick curing, forensic detail and long mold life. It can stay put even on horizontal surfaces, allowing for easy full body molds with the model in standing position.


Tips for using LifeRite


  • This silicone rubber features a mix ratio of 10 Parts A to 1 Part B by weight and is easy to mix. The base and catalyst should be mixed thoroughly to get an even lavender hue. Ensure that no catalyst remains on the base or sides of the container.
  • To slow down the working time, the base can be kept in the refrigerator for 15 minutes or even left in the freezer overnight.
  • Silicone rubber does not stick to anything but itself. Therefore, it can be directly applied on clean and dry skin. However, petroleum jelly or mold release is favored for keeping body hair from getting entangled in the silicone.
  • As latex rubber inhibits this platinum-cured silicone, wearing rubber gloves can keep the body mold from curing properly. It is advisable to use vinyl gloves instead.
  • The silicone can be applied with a soft bristle brush, spatula, palette knife or a manual or pneumatic cartridge gun system. Dearing is not required as both the base and catalyst are deaired at the manufacturing stage itself. However, applying a print coat first is preferable to eliminate any tiny air bubbles.
  • Allow the rubber to cure for 5 to 6 minutes before applying the shell mold.
  • After demolding, the body mold should be left to cure for an additional hour or so prior to the casting. Else pin-hole air bubbles may appear in the life cast.
  • Wax, plaster, clay or resin can be cast in the LifeRite mold. If making clay life casts for special effects works, the material should be sulfur-free as the presence of sulfur can again inhibit the curing.

Clear Ballistic Gel Available at EnvironMolds

The clear ballistic gel blocks and dummies replace standard ballistic gelatin as the most effective medium for testing terminal performance of different types of arms, ammunition and even body armor.

Terminal ballistic testing involves verifying the destructive effects of various firearms and ammunition on the real human body. Even body armor like vests need to be tested for the level of efficacy in protecting the human body.

This kind of testing requires dummies or backing material that can mimic human tissue. Clear ballistic gel torso has emerged as a standardized testing medium as the gelatin closely simulates both the density and viscosity of human and animal tissue. This can be used to analyze the effects of different bullet wounds or even as backing material when testing ballistic vests and the like.


EnvironMolds offers the first-ever commercially available and reusable ballistic testing dummy made of industry-leading, 100% synthetic ballistic gelatin without any organic materials. The dummy heads and torsos are suitable for testing any ammunition, weapons, personal armor, shields or any other protection equipment including shrapnel penetrations. What’s more, they can even provide penetrating and non-penetrating ballistic data from the same device at the same time. The clear ballistic gel dummies meet the FBI protocols for providing unmatched terminal ballistics data and are duly calibrated by Clear Ballistics.

The three-dimensional ballistic gel torso is designed to replicate an athletic male in great physical condition. It can be used in sitting position (vertical) or lying down (horizontal) for all types of testing, research or even recreation purposes. What’s more, the torso is reusable as the ballistic gelatin can be remelted and remolded any number of times.

Apart from this, the company website, https://www.artmolds.com also stocks clear ballistic gel blocks that can be molded into any shape. The blocks are available in varied sizes and types to suit different types of terminal ballistic testing and can be purchased by the pound as well.

The results are reliable and consistent and the clear ballistic gel torso is also considered the most cost effective ballistic testing medium!

Plaster Bandages in Body Molds

Life casting artists commonly use plaster of Paris bandages to reinforce the body molds. This keeps the otherwise flexible mold from flopping over itself and losing its shape, thus allowing for proper life casts.

Alginate is the most preferred material for making body molds. It is safe for the skin and captures minute details well. These molds have the making for excellent life casts.

However, alginate molds are flexible and cannot retain their shape after being demolded from the body. They tend to flop over themselves making casting difficult.

This is why life casting artists always reinforce the alginate body molds with Plaster of Paris bandages. This is known as a shell mold as it forms a rigid covering that supports the mold and facilitates easy casting.


The plaster bandages are in the form of long rolls of gauze that is infused with plaster powder. The technique is to wet the bandage and apply it over the mold. The plaster in the bandage will dry to form a rigid mold that helps the inner mold to retain its shape.

When making a shell mold, first cut out long strips of the plaster bandage. Take a bowl of warm water and dip one strip until it is saturated. Gently lift it out and squeeze the excess water. Apply on the mold surface while taking care to remove air bubbles by smoothing out the surface with the fingers. Repeat the process with each bandage while ensuring that each successive layer overlaps the earlier one until the entire mold is covered.

It is advisable to change the water once it starts getting milky. This is because some of the plaster is shed while wetting. Continuing to use the same may cause the bandages to delaminate after they have dried.

Once the mold is dry, demold from the body and continue casting as usual.

The same plaster bandages are sometimes used directly on the body as well. This is preferred for making molds of the abdomen, especially for pregnancy molds. It makes form molds of the shape as details are not required.


Backdating Mold Making and Casting

The techniques of mold making and casting are nothing new. In fact, they emerged way back in the Neolithic times and gradually developed as the key for making most of the objects we use and enjoy today.

Mold making and casting procedures are used to make most of the things we use – from household goods and decorative items to industrial equipment and structural components. These techniques are especially popular in the world of art and design and are patronized by artists of various genres. They are commonly used for new artworks, art reproductions, sculpture making, ceramic works, garden statuary, candle making, props, masks and the like. The same are also applied for architectural restoration works, prototype tooling, taxidermy, fossil preservation, etc.


Not to mention the beautiful art of life casting. Indeed, life casts have emerged as a magnificent mode of creating a three-dimensional reproduction of the live human body. The regular techniques of making molds and casts are used with appropriate skin-safe materials to make body molds and life casts of the face, hands, feet, belly, torso or even the entire body. These are extremely popular for infants, friends, families, pregnant mothers and more. The same is also used for medical prosthetics, special effects, animatronics, etc.


The synthetic materials like polyurethane resin, latex rubber and silicone rubber may be new additions to the fold, but mold making and casting themselves are not contemporary techniques by a long shot. In fact, they date back to the prehistoric times when settlements were being established and agriculture came into being. The primitives slowly developed these processes to fabricate tools, equipment, jewelry and religious artifacts What’s more, the oldest surviving casting of a copper frog dates back to 3200 BC!

With the passage of time, these techniques were applied for making and reproducing artworks, especially sculptures. The introduction of hollow wax casting was the precursor to the highly prized Greek statues and Roman copies made later.

Clay and plaster continued to be the popular medium of making molds and casts down the ages. Gradually, art schools started teaching mold making and casting and used wood or terracotta also to make the molds. This led to the creation of iconic artworks that remain illustrious till date. Simultaneously, they were used for making pottery and ceramics as well.

These age-old processes finally made their way from the homes of royals, aristocrats and art aficionados to the foundries of today. The advent of industrialization witnessed a quick adoption for the mass production of regular objects in a range of styles. Injection molding was introduced in industries and new materials like plastics and polymers also came into being. Everyday items became inexpensive due to lower costs of production.


These techniques were progressively incorporated into the making of complicated automotive parts, equipment, machinery and even structures.

Indeed, from the simple molds and casts of ancient times to two part molds and cold casting for artworks to highly technical and complex processes in industries - mold making and casting have surely come a long way!