Latex Rubber for Casting


From intricate crafts to industrial prototypes, latex rubber casting is a versatile technique used across various fields. Whether you're a hobbyist, an artist, or an industrial designer, understanding the basics of latex rubber casting can open up a world of creative possibilities. In this guide, we'll delve into the fascinating world of latex rubber for casting, exploring its uses, benefits, and how you can get started.


What is Latex Rubber Casting?


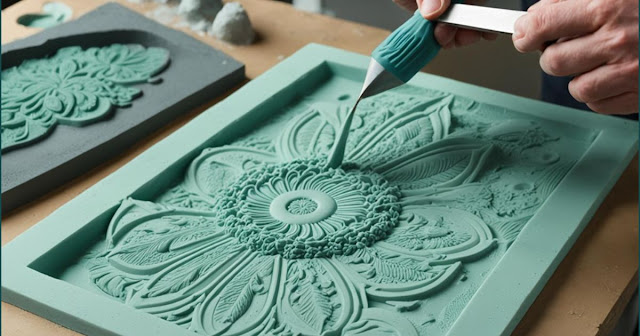
Latex rubber casting is a process used to create flexible, detailed replicas of original objects. It involves coating a master model with layers of liquid latex rubber, allowing it to dry, and then removing the rubber mold from the original. The resulting latex mold can then be used to cast multiple replicas using materials such as plaster, concrete, resin, or wax.


Uses of Latex Rubber Casting:


1. Art and Sculpture: Latex rubber casting is widely used in the art world for creating detailed sculptures, masks, and other forms of artistic expression.

2. Crafts and DIY Projects: Hobbyists and DIY enthusiasts use latex rubber casting for making decorative items, cosplay props, and model kits.

3. Industrial Prototyping: In industrial settings, latex rubber casting is used to create prototypes, architectural models, and specialized parts.


Benefits of Latex Rubber Casting:


1. Detail Reproduction: Latex rubber molds capture fine details, textures, and undercuts, making them ideal for replicating intricate objects.

2. Flexibility: Latex rubber molds are flexible and durable, allowing for easy demolding and multiple castings.

3. Cost-Effective: Compared to other molding materials, latex rubber is relatively inexpensive, making it a cost-effective choice for small-scale casting projects.

4. Versatility: Latex rubber molds can be used to cast a wide range of materials, including plaster, concrete, resin, and wax.


Getting Started with Latex Rubber Casting:


1. Selecting the Right Latex: Choose a high-quality liquid latex rubber that is specifically formulated for mold making. Consider factors such as viscosity, curing time, and flexibility.

2. Preparing the Master Model: Ensure that your master model is clean, dry, and free from any debris or imperfections. Apply a release agent to prevent the latex from sticking to the original.

3. Applying the Latex: Use a brush, sponge, or spray gun to apply thin, even layers of liquid latex rubber to the surface of the master model. Allow each layer to dry before applying the next.

4. Building Up Layers: Depending on the desired thickness of the mold, you may need to apply multiple layers of latex rubber, allowing each layer to dry completely before proceeding.

5. Demolding the Mold: Once the latex rubber has fully cured, carefully remove the mold from the master model, taking care not to damage the mold or the original.

6. Casting Replicas: Use the latex rubber mold to cast replicas using the material of your choice, such as plaster, concrete, resin, or wax. Allow the casting material to cure completely before demolding.


Tips for Success:


- Work in a well-ventilated area: Latex rubber casting can produce fumes, so it's essential to work in a well-ventilated area or wear a respirator.

- Experiment with additives: You can modify the properties of latex rubber by adding thickeners, accelerators, or pigments to achieve the desired results.

- Practice good mold care: Properly store and maintain your latex rubber molds by keeping them clean, dry, and away from direct sunlight.


Conclusion:


Latex rubber casting is a versatile and cost-effective technique for creating detailed replicas of original objects. Whether you're an artist, a crafter, or an industrial designer, mastering the art of latex rubber casting opens up a world of creative possibilities. With the right materials, techniques, and a bit of practice, you can bring your ideas to life with stunning realism and precision with ArtMolds.


10 Crucial LaTeX Tips and Tricks You Need to Know | EnvironMolds

Exploring the Versatility of Silicone Rubber: Creating 3D Models

Silicone rubber is a versatile material that finds applications in various industries, from automotive to healthcare. One of its lesser-known applications is in creating 3D models. In this article, we'll explore how silicone rubber is used to create intricate and detailed 3D models.

Body:

1. What is Silicone Rubber?
   - Brief introduction to silicone rubber, its properties, and why it's a popular choice for various applications.

2. Properties of Silicone Rubber:
   - Highlight the key properties of silicone rubber that make it suitable for creating 3D models.
   - Flexibility, durability, heat resistance, etc.

3. Creating 3D Models with Silicone Rubber:
   - Discuss the process of using silicone rubber to create 3D models.
   - Mold-making techniques.
   - Pouring silicone rubber into molds.
   - Removing the model from the mold.


4. Advantages of Silicone Rubber in 3D Modeling:
   - Detail retention.
   - Reproduction accuracy.
   - Durability and longevity of the models.

5. Applications of Silicone Rubber 3D Models:

   - Engineering prototypes.
   - Medical models.
   - Architectural models.
   - Toy prototyping.
   - Special effects in the film industry.

6. Challenges and Solutions:
   - Discuss any challenges faced when using silicone rubber for 3D modeling and how to overcome them.

7. Conclusion:
   - Recap the advantages of using silicone rubber for creating 3D models.
   - Encourage readers to explore the possibilities of silicone rubber in their own projects.

Conclusion:
Silicone rubber offers a versatile and effective solution for creating detailed 3D models. Its unique properties make it an ideal choice for a wide range of applications. By understanding the process and advantages of using silicone rubber, you can unlock a world of possibilities for your own projects.

Reference URL: Silicone Rubber Has a Lot Going for It


The story of Pregnancy Casting

Pregnancy is a beautiful journey filled with memorable moments and milestones. As an expecting mother, you may find yourself wanting to capture this special time in a unique and creative way. One way to immortalize the beauty of pregnancy is through pregnancy casting, a form of life casting that creates a lasting memento of your pregnant belly.

At Artmolds, we specialize in body casting materials and offer a wide range of products for all your casting needs. From silicone to alginate, we have everything you need to create stunning pregnancy casts that you'll cherish for years to come.
 

What is Pregnancy Casting?


Pregnancy casting, also known as belly casting or belly masking, is a process of creating a three-dimensional sculpture of a pregnant belly using casting materials. It's a beautiful way to celebrate and remember the special journey of pregnancy.
 

How Does Pregnancy Casting Work?


The process of pregnancy casting is simple and safe. Here's how it works:

1. Preparation: The expecting mother applies a release agent to her belly to protect the skin and make it easier to remove the cast later.

2. Casting: A casting material, such as alginate or silicone, is applied to the belly. The material is carefully smoothed over the surface to capture all the intricate details.

3. Setting: Once the casting material has set, usually within a few minutes to an hour, it's carefully removed from the belly.

4. Finishing: The cast is allowed to fully cure, and then it can be sanded, painted, or decorated according to the mother's preferences.

Why Choose Artmolds for Pregnancy Casting?


At Artmolds, we offer a wide range of casting materials specifically designed for pregnancy casting. Our high-quality products ensure that you get the best results every time. Here are some reasons to choose Artmolds for your pregnancy casting needs:

1. High-Quality Materials: Our casting materials are made from the finest ingredients to ensure a smooth and flawless finish every time.

2. Variety of Options: Whether you prefer alginate or silicone, we have a variety of options to suit your needs and preferences.

3. Expert Support: Not sure where to start? Our team of experts is here to help! We can provide guidance and advice to ensure that your pregnancy casting experience is easy and enjoyable.
 

Create Your Own Pregnancy Casting with Artmolds


Ready to capture the beauty of your pregnancy with a stunning cast? Visit Artmolds today to browse our selection of casting materials and start your pregnancy casting journey. Don't forget to check out our blog for more tips and inspiration!
 

Unique Ceramic Belly Bowl


Plaster Bandages: The Sculptor's Secret Weapon

Plaster of Paris bandages offer a unique and versatile medium for unleashing your creativity through sculpting. Discover the joy of transforming these malleable strips into breathtaking works of art that capture your imagination. Whether you're a seasoned sculptor or a beginner, plaster bandages provide an accessible and affordable way to explore the world of three-dimensional artistry.

In the realm of sculpting, few materials rival the versatility and accessibility of plaster of Paris bandages. These unassuming strips of fabric, infused with a gypsum-based compound, have the power to transform your creative vision into tangible, three-dimensional masterpieces. From delicate figurines to bold abstract forms, these offer a canvas for your artistic expression, limited only by your imagination.

The Magic of Plaster Bandages

At the heart of plaster of Paris bandages lies a remarkable material that has been embraced by artists and hobbyists alike for centuries. Derived from gypsum, a naturally occurring mineral, these bandages possess a unique ability to harden and retain their shape when exposed to water. This property allows you to mold and sculpt them into virtually any form imaginable, capturing the intricate details and nuances of your design.

Versatility Meets Affordability

One of the most appealing aspects of working with plaster bandages is their accessibility. Unlike traditional sculpting materials that can be costly or require specialized equipment, these are affordable and readily available. This makes them an ideal choice for artists of all skill levels, from beginners exploring their creative potential to professionals seeking a cost-effective medium for their projects.

Unleashing Your Creativity: Step-by-Step

To embark on your sculpting journey, you'll need a few basic supplies: plaster of Paris bandages, water, a workspace, and some sculpting tools (which can be as simple as your hands or common household items). Here's a broad outline of the procedure:

  1. Preparation: Gather your supplies and choose a suitable workspace. Cover your work area with a protective layer to prevent any mess.
  2. Soaking: Submerge the bandages in water for a few minutes, allowing them to become thoroughly saturated.
  3. Sculpting: Remove the bandages from the water, gently squeezing out any excess moisture. Begin wrapping and shaping the wet bandages around a base form or directly onto your chosen surface, building up layers to create your desired sculpture.
  4. Detailing: As the plaster begins to set, use sculpting tools or your fingers to add intricate details, textures, and finishing touches to your work.
  5. Drying: Allow your sculpture to fully dry and cure, which typically takes several hours or overnight, depending on the size and thickness of your piece.
  6. Finishing: Once completely dry, you can paint, varnish, or further embellish your sculpture to achieve your desired aesthetic.

Unleash Your Imagination

The beauty of plaster bandages lies in their ability to transcend traditional sculpting boundaries. From lifelike portraits and figurines to abstract forms and whimsical creatures, the possibilities are endless. Experiment with different techniques, such as layering, texturing, and incorporating found objects, to create truly unique and personalized works of art.

Conclusion:

Embrace the world of sculpting and unleash your inner sculptor at www.artmolds.com. Discover the joy of transforming these humble materials into extraordinary works of art that reflect your creativity and passion. Explore our extensive range of plaster of paris bandages and sculpting supplies and let your imagination soar. Join the countless artists who have found solace and inspiration in this versatile medium. Unleash your creativity today with plaster bandages – where art meets endless possibilities.

Unlocking the Secrets of Making a Mold: A Gateway to Infinite Possibilities

Welcome to the exciting world of mold making! Do you ever stop and wonder how artists and makers recreate amazing sculptures and objects? How do they make sure every little detail is perfect?

The magic is all about making a mold. It's a tradition that dates to ancient times. Today, it's a key to making and sharing beautiful creations. Mold making lets artists make many copies of their work. It also lets them play with new materials and techniques.

So, what is mold making, and how can you start your own journey?

We'll explore the basics of mold making. We'll show you the steps and the tools you'll need. From choosing materials to keeping fine details, we've got you covered. Get ready to jump into a world of endless creativity!

Mold Making

  • Mold making is an ancient art form that allows artists to replicate objects and explore endless creative possibilities.
  • Quality materials, such as those provided by Artmolds, play a crucial role in successful mold making.
  • Understanding the fundamentals of mold making, including the different types of molds and the step-by-step process, is essential.
  • Advanced techniques in mold making, such as multi-part molds and mold modification, can take your skills to the next level.
  • By exploring the art of making molds, you can elevate your craft and open a world of possibilities for casting and reproducing your favorite pieces.

making a mold

Understanding the Basics of Mold Making

Welcome to our detailed guide on making a mold! You're about to learn a lot about this amazing art. We'll give you the basics so you can start your own mold making adventure.

First, let's look at the main types of molds used. Silicone and plaster molds are two common choices.

  • Silicone molds: These are great for their flexibility and durability. They can capture very fine details. They're perfect for making molds of items using materials like resin, wax, and clay.Silicone molds can be poured or brushed on the item. This creates a perfect copy of your original piece.
  • Plaster molds: Plaster molds are affordable and versatile. They're mainly used for simple molds. Plaster molds work well for casting materials such as concrete, plaster, or soap. They help you get smooth and clean finishes easily.

Now, with the types of molds explained, let's get into the details of how to make a mold. It's a detailed set of steps to make sure your mold turns out well.

  1. Get your workspace ready, including setting up your original item and the mold box.
  2. Choose the right mold material, like silicone or plaster, based on your project.
  3. Mix the mold material following the instructions, making sure the ratio is correct.
  4. Apply the material to your item, making sure to cover all the details.
  5. Let the mold dry or set for the recommended time.
  6. Take the mold off the item slowly to not damage it.
  7. Clean and check your mold to ensure it's ready for casting.

Follow these steps, using the right materials. You will make a reliable mold that perfectly copies your item. It will catch all the small details too.

Now, you know the basics of making a mold. You're set to let your creativity soar. Whether you're an artist, crafter, or just like to DIY, mold making is key. It helps take your projects to a whole new level.

Exploring Advanced Mold Making Techniques

To become a master in mold making, it's key to try advanced methods. This part will show you techniques that take your skills up a notch.

Multi-Part Molds

Creating multi-part molds is a complex but rewarding method. It allows you to catch every detail and shape. This is perfect for pieces with intricate designs.

When making a multi-part mold, ensure each part is smoothly separated. Use a mold release agent to aid this. Then, align and secure each piece properly for an accurate reproduction.

Mold Modification

Sometimes, you might need to tweak a mold to fit your needs better. This is where mold modification comes in. It helps adjust the mold for different materials or sizes.

Modifying a mold requires careful handling. Take your time and be meticulous to prevent errors. Proper planning ensures the changes match your vision.

Creating Molds for Complex Objects

Handling complex objects in mold making can be tough. Yet, there are methods to make it work, even for the most detailed designs.

A useful method is a two-part mold for complex shapes. This way, you can get your casting out easily without losing details. It works great for items with tricky parts or cuts.

Using flexible materials, like silicone rubber, is also a key trick. They help take the shape of the object accurately and demold easily. This keeps the final product's details intact.

By learning advanced techniques, you open to more creative possibilities. You can handle challenging projects and get pro-level results. So, dive into these methods and let your creativity flow.

Conclusion

Mold making is a cool way to copy stuff and let loose your artistic side. All you need are the proper materials and some know-how. Then, you can start making molds that help make whatever you like.

Being into mold making can really level up your creative game. It fits anyone who loves art, does it for fun, or likes DIY. Making a mold gives you a huge sense of accomplishment. You see what you've imagined right in front of you. It's like making your dream a reality, mold by mold.

At Artmolds, we care a lot about what goes into mold making. Our products are perfect for both newbies and those who do it like a pro. We offer solutions you can trust. So, when you're ready to start, we're here to help you get great results.

Don't put it off any longer. Dive into the world of mold making right now. Artmolds is here to show you how to make a mold. Let's turn your creative dreams into something real, starting today.

FAQ

What supplies are necessary for creating mold?

You will need mold-making silicone, a mold box, and a mixing container to make a mold. Also, get a release agent and a scale for accurate measurements. Don't forget various tools for mixing the molds.

How long does it take to make a mold?

Making a mold's timing depends on the object's complexity and mold type. Simple molds finish in a few hours. More complex ones need steps and curing, taking days.

Can I make a mold of any object?

Yes, you can mold almost any object if it's safe and you have the right skills and materials. Remember, think about the object's size, shape, and how tricky it is. Some objects may need special techniques or multiple molds for better results.

How do I ensure my mold captures all the details of the object?

To get every detail, carefully apply the mold material to the object. Make sure it fills every small space. Techniques like brushing or using a vacuum can help. They reduce air bubbles for a smoother, more detailed mold.

What safety precautions should I take when making a mold?

Keeping safe when making a mold is key. Always work where there’s fresh air or wear a respirator against fumes. Use gloves and eye protection to avoid touching the materials. Also, follow the product instructions for safety.

Can I reuse a mold?

Usually, molds can be used several times, depending on their type and the materials. For example, silicone molds are durable and good for many uses. But, over time, wear, tear, or design changes might mean making a new mold.


Confidence & Comfort: Why Breast Mold Kits Are Essential for Self-Exams


Breast self-exams are a crucial part of maintaining women's health, yet many find the process daunting and uncomfortable. Here's where breast mold kits, also known as breast casting kits or alginate casting kits, can make a significant difference. These innovative tools not only promote self-confidence but also provide a comfortable and empowering way to perform regular breast checks. In this comprehensive blog, we'll explore the benefits of incorporating breast mold kits into your self-care routine and why they are an essential tool for every woman.

The Importance of Breast Self-Exams

Performing regular breast self-exams is a vital step in early breast cancer detection. This simple yet effective practice allows women to familiarize themselves with the normal look and feel of their breasts, enabling them to identify any changes or abnormalities that may require medical attention. Unfortunately, many women find the process intimidating or uncomfortable, leading to inconsistent or abandoned self-exams.

Breast Mold Kits: A Transformative Solution

Breast mold kitsoffer a revolutionary approach to breast self-exams. These easy-to-use kits allow women to create a detailed, three-dimensional model of their breasts, providing a visual and tactile reference for future self-checks. By capturing the unique contours and characteristics of their breasts, women can become more comfortable and confident in performing regular examinations.

The Benefits

  1. Increased Comfort and Confidence- Using a breast casting kit can significantly alleviate the discomfort and anxiety associated with traditional breast self-exams. The process of creating a breast cast is often described as soothing and empowering, as women take an active role in understanding their bodies.
  2. Enhanced Breast Awareness- The detailed model created with a breast mold kit serves as a valuable reference point, allowing women to become intimately familiar with the unique features of their breasts. This heightened awareness makes it easier to detect any changes or abnormalities during future self-exams.
  3. Improved Technique and Consistency- Withalginate castingkit, women can practice their self-exam technique on the cast, refining their approach and developing a consistent routine. This can lead to more thorough and effective self-examinations, increasing the likelihood of early detection of any potential issues.
  4. Personalized Medical Consultations-If a woman does discover a change during a self-exam, the breast mold can serve as a valuable tool during medical consultations. By showing the healthcare provider the exact nature and location of the change, women can communicate their concerns more effectively and facilitate better-informed decision-making.

Choosing the Right Breast Mold Kit

When selecting a breast mold kit, it's important to choose a reputable and high-quality product, such as those offered by ArtMolds. These kits are designed with comfort, ease of use, and accuracy in mind, ensuring that women can create a precise and detailed representation of their breasts.

Incorporating Breast casting Kits into Your Routine

Integrating a breast casting kit into your self-care routine is a straightforward process. Set aside some time, find a comfortable and private space, and follow the instructions provided with the kit. The process is typically quick and painless, and the resulting breast cast can serve as a valuable tool for years to come.

Conclusion

Breast casting kits are an essential tool for women who want to take an active and empowered approach to their breast health. By providing a comfortable and personalized method for breast self-exams, these innovative products can help increase confidence, improve breast awareness, and facilitate early detection of any potential issues. Visit https://www.artmolds.com/ today and discover the transformative power of breast mold kits in your self-care routine.

FAQs

What is a breast mold kit, and how does it work?

A breast mold kit, also known as a breast casting kit or alginate casting kit, is a tool that allows women to create a detailed, three-dimensional model of their breasts. The process typically involves applying a safe, non-toxic alginate material to the breasts, which then hardens into a cast that can be used as a reference for future breast self-exams.

Why are breast mold kits essential for self-exams?

Breast mold kits can significantly improve the comfort and confidence associated with performing regular breast self-exams. By providing a personalized, visual reference of the breasts, these kits help women become more familiar with the unique characteristics of their own bodies, making it easier to detect any changes or abnormalities.

How often should I use a breast mold kit?

The frequency of using a breast mold kit will depend on individual preferences and needs. Many women find it beneficial to create a new breast cast annually or whenever they notice significant changes in the appearance or feel of their breasts. Consulting with a healthcare provider can help determine the optimal schedule for using a breast mold kit.

Can breast mold kits be used for medical purposes?

Yes, breast mold kits can be valuable tools during medical consultations. By providing a detailed, three-dimensional representation of the breasts, women can more effectively communicate any concerns or changes they have noticed, which can aid healthcare providers in making informed decisions about further examinations or treatments.

Are breast mold kits safe to use?

Yes, high-quality breast mold kits, like those offered by ArtMolds, are designed with safety and comfort in mind. The materials used, such as alginate, are non-toxic and pose no known health risks when used as directed. It is always recommended to follow the instructions provided with the kit and consult with a healthcare provider if you have any concerns.

Where can I purchase a breast mold kit?

Breast mold kits, or breast casting kits, can be purchased through reputable online retailers, such as ArtMolds.com. These kits are designed to be user-friendly and provide all the necessary materials and instructions for creating a detailed, personalized breast cast.

Crafting Confidence: How Pressure Pots Unlock the Secret to Flawless Resin Creations


In the captivating world of resin art, where the interplay of colors and textures captivates the senses, the use of a pressure pot has become an indispensable tool for achieving flawless, bubble-free results. This blog explores the art of crafting with confidence, delving into the crucial role that they play in ensuring the success of resin projects.

The Importance of Pressure Pots for Resin Creations

Resin, a versatile and alluring medium, has become a staple in the world of crafting and art. However, the creation of resin pieces can be a delicate process, prone to the formation of unsightly air bubbles that can detract from the desired aesthetic. This is where the pressure pot steps in as a game-changer, providing the essential pressure needed to eliminate these pesky bubbles and produce a smooth, professional-looking finish.

Pressure Pots: The Resin Artist's Secret Weapon

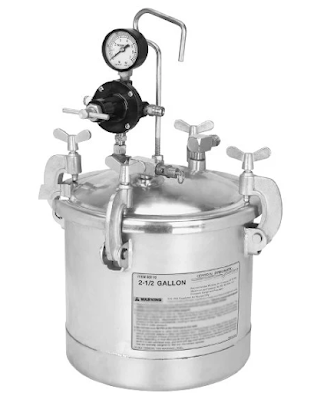
A Resin Pressure pot is a specialized container designed to apply controlled pressure to resin-based projects during the curing process. By subjecting the resin to consistent pressure, these effectively force any air bubbles to the surface, where they can be easily removed. This ensures a stunning, bubble-free finish that showcases the intricate details and vibrant colors of the resin work.

Achieving Flawless Resin Creations

Using a pressure pot for resin projects is a simple yet highly effective technique. The process involves carefully pouring the mixed resin into a mold or container, then placing the entire setup inside the pot. The pot is then sealed and pressurized, typically to around 30-60 PSI, depending on the specific project requirements.

As the resin cures under pressure, the air bubbles are forced to the surface, where they can be easily removed. This allows the resin to set with a smooth, crystal-clear finish, free from any unsightly imperfections. The use of a pressure pot also helps to ensure a more uniform curing process, leading to greater consistency and durability in the final product.


The Benefits for Resin Artists

Investing in a high-quality resin pressure pot can provide numerous benefits for resin artists, from hobbyists to professionals. By utilizing this, creators can:

  • Achieve Flawless Finishes: The consistent pressure applied by the pot ensures the elimination of air bubbles, resulting in a smooth, glossy, and visually stunning final product.
  • Enhance Productivity: With the ability to produce bubble-free resin pieces quickly and efficiently, these can significantly increase the output and productivity of resin artists.
  • Expand Creative Possibilities: The absence of air bubbles opens a world of creative possibilities, allowing artists to explore intricate designs, delicate details, and bold color combinations without the fear of unsightly imperfections.
  • Ensure Consistent Quality: The standardized pressure and curing process provided by a pressure pot helps to maintain a high level of quality and consistency in resin creations, making it an invaluable tool for both hobbyists and professional artists.
  • Increase Durability: The elimination of air bubbles during the curing process results in a stronger, more durable resin piece, capable of withstanding the test of time and various environmental conditions.

Choosing the Right Pot for Your Resin Creations

When it comes to selecting a pressure potfor resin crafting, it's essential to consider factors such as the size of the projects you typically undertake, the maximum pressure required, and the overall quality and durability of the pot. Investing in a well-made, reliable pot can make all the difference in producing flawless resin creations time and time again.

Conclusion

At ArtMolds, we believe that the power of pressure pots is the key to unlocking the full potential of resin artistry. By incorporating these essential tools into your creative process, you can elevate your resin creations to new heights, ensuring a level of quality and professionalism that will captivate your audience and leave a lasting impression. Embrace the confidence that comes with crafting with a pressure pot and let your resin art shine.

FAQs

What is the recommended pressure range for resin projects?

The recommended pressure range for resin projects typically falls between 30-60 PSI. This pressure range is effective in eliminating air bubbles and ensuring a smooth, professional finish.

How long should I leave my resin project in the pressure pot?

The curing time in the pressure pot can vary depending on the specific resin formula and the size of your project. As a general guideline, it's recommended to leave the resin piece in the pressure pot for at least 2-4 hours, or until the resin has fully cured.

Can I use a pressure pot for other crafting mediums besides resin?

Yes, pressure pots can be used for a variety of crafting mediums, such as epoxy, silicone, and even certain types of clay. The key is to ensure that the pressure pot is rated for the specific material you're working with.

How do I properly clean and maintain my pressure pot?

Proper cleaning and maintenance of your pressure pot are essential to ensure its longevity and optimal performance. After each use, thoroughly clean the interior of the pot and all its components, and make sure to store it in a dry, well-ventilated area.

Can I use a pressure pot for large-scale resin projects?

Yes, pressure pots come in a range of sizes to accommodate projects of various scales. When working on larger resin pieces, it's important to select a pressure pot that can accommodate the size and weight of your project.

How do I know if my pressure pot is working correctly?

To ensure your pressure pot is functioning correctly, regularly check the pressure gauge and make sure the pot is holding the desired pressure throughout the curing process. Furthermore, examine the seals and gaskets for any indications of wear or damage.